Your First Rive Script
This page teaches Rive scripting from scratch. We'll explain every concept as we go - no prior knowledge needed.
Already comfortable with programming? Skip to How Rive Scripts Work for the fast-track version with JavaScript/After Effects comparisons.
What is a Script?
A script is a set of instructions that tells a computer what to do. Think of it like a recipe:
| Recipe | Script |
|---|---|
| "Add 2 cups of flour" | "Set the circle size to 50" |
| "Stir for 3 minutes" | "Move the shape right by 10 pixels" |
| "Repeat until smooth" | "Keep animating until stopped" |
The difference? A recipe is for humans. A script is written in a programming language that computers understand.
Rive uses a language called Luau (pronounced "loo-ow"). It's designed to be readable and beginner-friendly.
Storing Information: Variables
Imagine you have labeled boxes where you can store things:
- A box labeled "score" containing the number
0 - A box labeled "playerName" containing the text
"Alex" - A box labeled "isGameOver" containing
false(meaning "no")
In programming, these labeled boxes are called variables. Here's how you create them in Luau:
local score = 0
local playerName = "Alex"
local isGameOver = false
Let's break down local score = 0:
| Part | Meaning |
|---|---|
local | "I'm creating a new variable" |
score | The name of the variable (the label on the box) |
= | "Put this value inside" |
0 | The value being stored |
Why "local"? It tells Luau this variable belongs to this specific part of your script. Always use local when creating variables.
-- Create a variable named "health" with value 100
 health = 100

-- Create a variable named "name" with text "Hero"
local  = "Hero"
Types of Values
Variables can hold different types of values:
| Type | What it is | Examples |
|---|---|---|
| number | Any numeric value | 42, 3.14, -10, 0 |
| string | Text (always in quotes) | "Hello", "Player 1", "" |
| boolean | True or false | true, false |
local age = 25           -- number
local greeting = "Hi!"   -- string (notice the quotes)
local isReady = true     -- boolean
Rive needs to know what type of value you're working with. You can't do math with text, and you can't display a true/false as a name. Types help prevent mistakes.
Reusable Instructions: Functions
Sometimes you want to run the same instructions multiple times. Instead of writing them over and over, you put them in a function - a named block of instructions you can reuse.
Think of a function like a recipe card with a name:
-- Define a function named "sayHello"
local function sayHello()
    print("Hello there!")
    print("Welcome to Rive!")
end
This creates a recipe called sayHello. The instructions inside (between function and end) don't run yet - they're just saved for later.
To actually run those instructions, you call the function:
sayHello() -- This runs the instructions inside
The () after the name means "run this function now."
Functions That Take Input
Functions become more powerful when they can receive information. These inputs are called parameters:
local function greet(name)
    print("Hello, " .. name .. "!")
end

greet("Alex")    -- Prints: Hello, Alex!
greet("Jordan")  -- Prints: Hello, Jordan!
Here, name is a parameter - a placeholder that gets filled in when you call the function.
You can have multiple parameters:
local function add(a, b)
    print(a + b)
end

add(5, 3)   -- Prints: 8
add(10, 20) -- Prints: 30
-- A function that takes a number and doubles it
local function double()
  print(x * 2)
end

-- Call the function with the value 5
(5)  -- Prints: 10
Functions That Give Back Values
Some functions calculate something and return the result:
local function double(x)
    return x * 2
end

local result = double(5)  -- result is now 10
print(result)             -- Prints: 10
The return keyword sends a value back to wherever the function was called.
Quick Review: The Building Blocks
Before we look at Rive scripts, let's make sure we've got the basics:
| Concept | What it is | Example |
|---|---|---|
| Variable | A named container for storing values | local score = 0 |
| String | Text data (in quotes) | "Hello" |
| Number | Numeric data | 42 or 3.14 |
| Boolean | True or false | true or false |
| Function | A reusable block of instructions | local function doSomething() ... end |
| Parameter | Input that a function receives | function greet(name) |
| Return | Value that a function sends back | return x * 2 |
Now Let's Look at a Rive Script
Here's the simplest possible Rive script. Don't worry - we'll explain every line:
export type MyScript = {}

function init(self: MyScript, context: Context): boolean
    print("Script started!")
    return true
end

function draw(self: MyScript, renderer: Renderer)
    -- Drawing code goes here
end

return function(): Node<MyScript>
    return {
        init = init,
        draw = draw,
    }
end
That's a lot of code to do almost nothing! But each part has a purpose. Let's go through them one by one.
Part 1: Defining Your Data
export type MyScript = {}
This line describes what data your script will store. Right now the {} is empty, but you'd add your variables here:
export type MyScript = {
    score: number,      -- I'll store a number called "score"
    playerName: string, -- I'll store text called "playerName"
}
Why do this? Two reasons:
- Documentation - Anyone reading your code knows what data it uses
- Error checking - Strict mode can warn you if you try to use data you didn't declare
The export keyword makes this type definition visible to Rive.
-- Define a script type that stores:
-- - a number called "health"
-- - a boolean called "isAlive"

export type Player = {
  health: ,
  isAlive: ,
}
Part 2: The Init Function (Runs Once)
function init(self: MyScript, context: Context): boolean
    print("Script started!")
    return true
end
This function runs once when your script starts. It's where you set up initial values.
Let's decode the first line:
| Part | Meaning |
|---|---|
function init | We're defining a function called "init" |
(self: MyScript) | It receives your script's data as "self" |
(context: Context) | It also receives runtime context (ViewModel/assets access) |
: boolean | It must return true or false |
What is self? It's your script's personal storage - all the variables you defined in your type. You access them with self.variableName.
Why return true or false?
return true= "Everything is fine, keep running"return false= "Something went wrong, stop the script"
Part 3: The Draw Function (Renders Graphics)
function draw(self: MyScript, renderer: Renderer)
    -- Drawing code goes here
end
This function is called when Rive needs to display your graphics. The renderer parameter is your tool for drawing shapes.
Important rules for draw:
- Only draw things here - don't change your data
- It might be called multiple times per second
- Even if you're not drawing anything, this function must exist
Part 4: The Factory Function (Creates Instances)
This is the trickiest part. Bear with me:
return function(): Node<MyScript>
    return {
        init = init,
        draw = draw,
    }
end
Why is this necessary?
Imagine you use the same script asset in 5 different places. Each script node needs its own separate data. If they shared the same variables, changing one would change all of them!
The factory function creates a fresh copy of your script for each script node. Every time Rive needs a new instance, it calls this function to get one.
Think of it like a cookie cutter:
- The factory function is the cookie cutter
- Each script node gets its own fresh cookie (instance)
- They all look the same but are separate cookies
Putting It All Together
Now let's arrange these parts in the correct order:
Put these parts in the order they appear in a Rive script:
Exercise: Your First Working Script ⭐
Premise
Now it's time to create a real script in Rive! This exercise walks you through the complete process: creating a script, adding it to the artboard, and seeing it run.
By the end of this exercise, you will have created and run your first Rive script, seen console output, and understood what happens when something goes wrong.
Use Case
This is the foundation for everything you'll build in Rive scripts.
What you'll learn:
- How to create a Node Script in Rive
- How to add a script node to the artboard
- How to see console output
- What errors look like in the Problems panel
Setup
In Rive Editor:
-
Create a new file (or use an existing one)
-
Draw any shape:
- Use the Rectangle or Ellipse tool to draw a shape on the Artboard
- This gives you a visual reference while the script runs
-
Create the script:
- Go to the Assets panel (left side)
- Click
+→ Script → Node Script - Name it
MyFirstScript
-
Open the Console:
- Menu: View → Console
- This is where
print()messages appear
-
Open the Problems panel:
- Menu: View → Problems
- This is where errors appear
Starter Code
Copy and paste this entire script into the Rive script editor:
export type MyFirstScript = {
    message: string,
    counter: number,
}

function init(self: MyFirstScript, context: Context): boolean
    -- This runs once when the script starts
    print("=== MY FIRST SCRIPT ===")
    print("init() is running!")
    print("Message: " .. self.message)

    self.counter = 0

    print("Setup complete!")
    print("ANSWER: success")
    return true
end

function advance(self: MyFirstScript, elapsed: number): boolean
    -- This runs every frame
    self.counter = self.counter + 1

    -- Only print for the first 3 frames (to avoid spam)
    if self.counter <= 3 then
        print("advance() frame #" .. self.counter)
    end

    return true
end

function draw(self: MyFirstScript, renderer: Renderer)
    -- This runs when graphics need to be drawn
    -- We're not drawing anything yet - that comes later!
end

return function(): Node<MyFirstScript>
    return {
        init = init,
        advance = advance,
        draw = draw,
        message = "Hello from Rive!",
        counter = 0,
    }
end
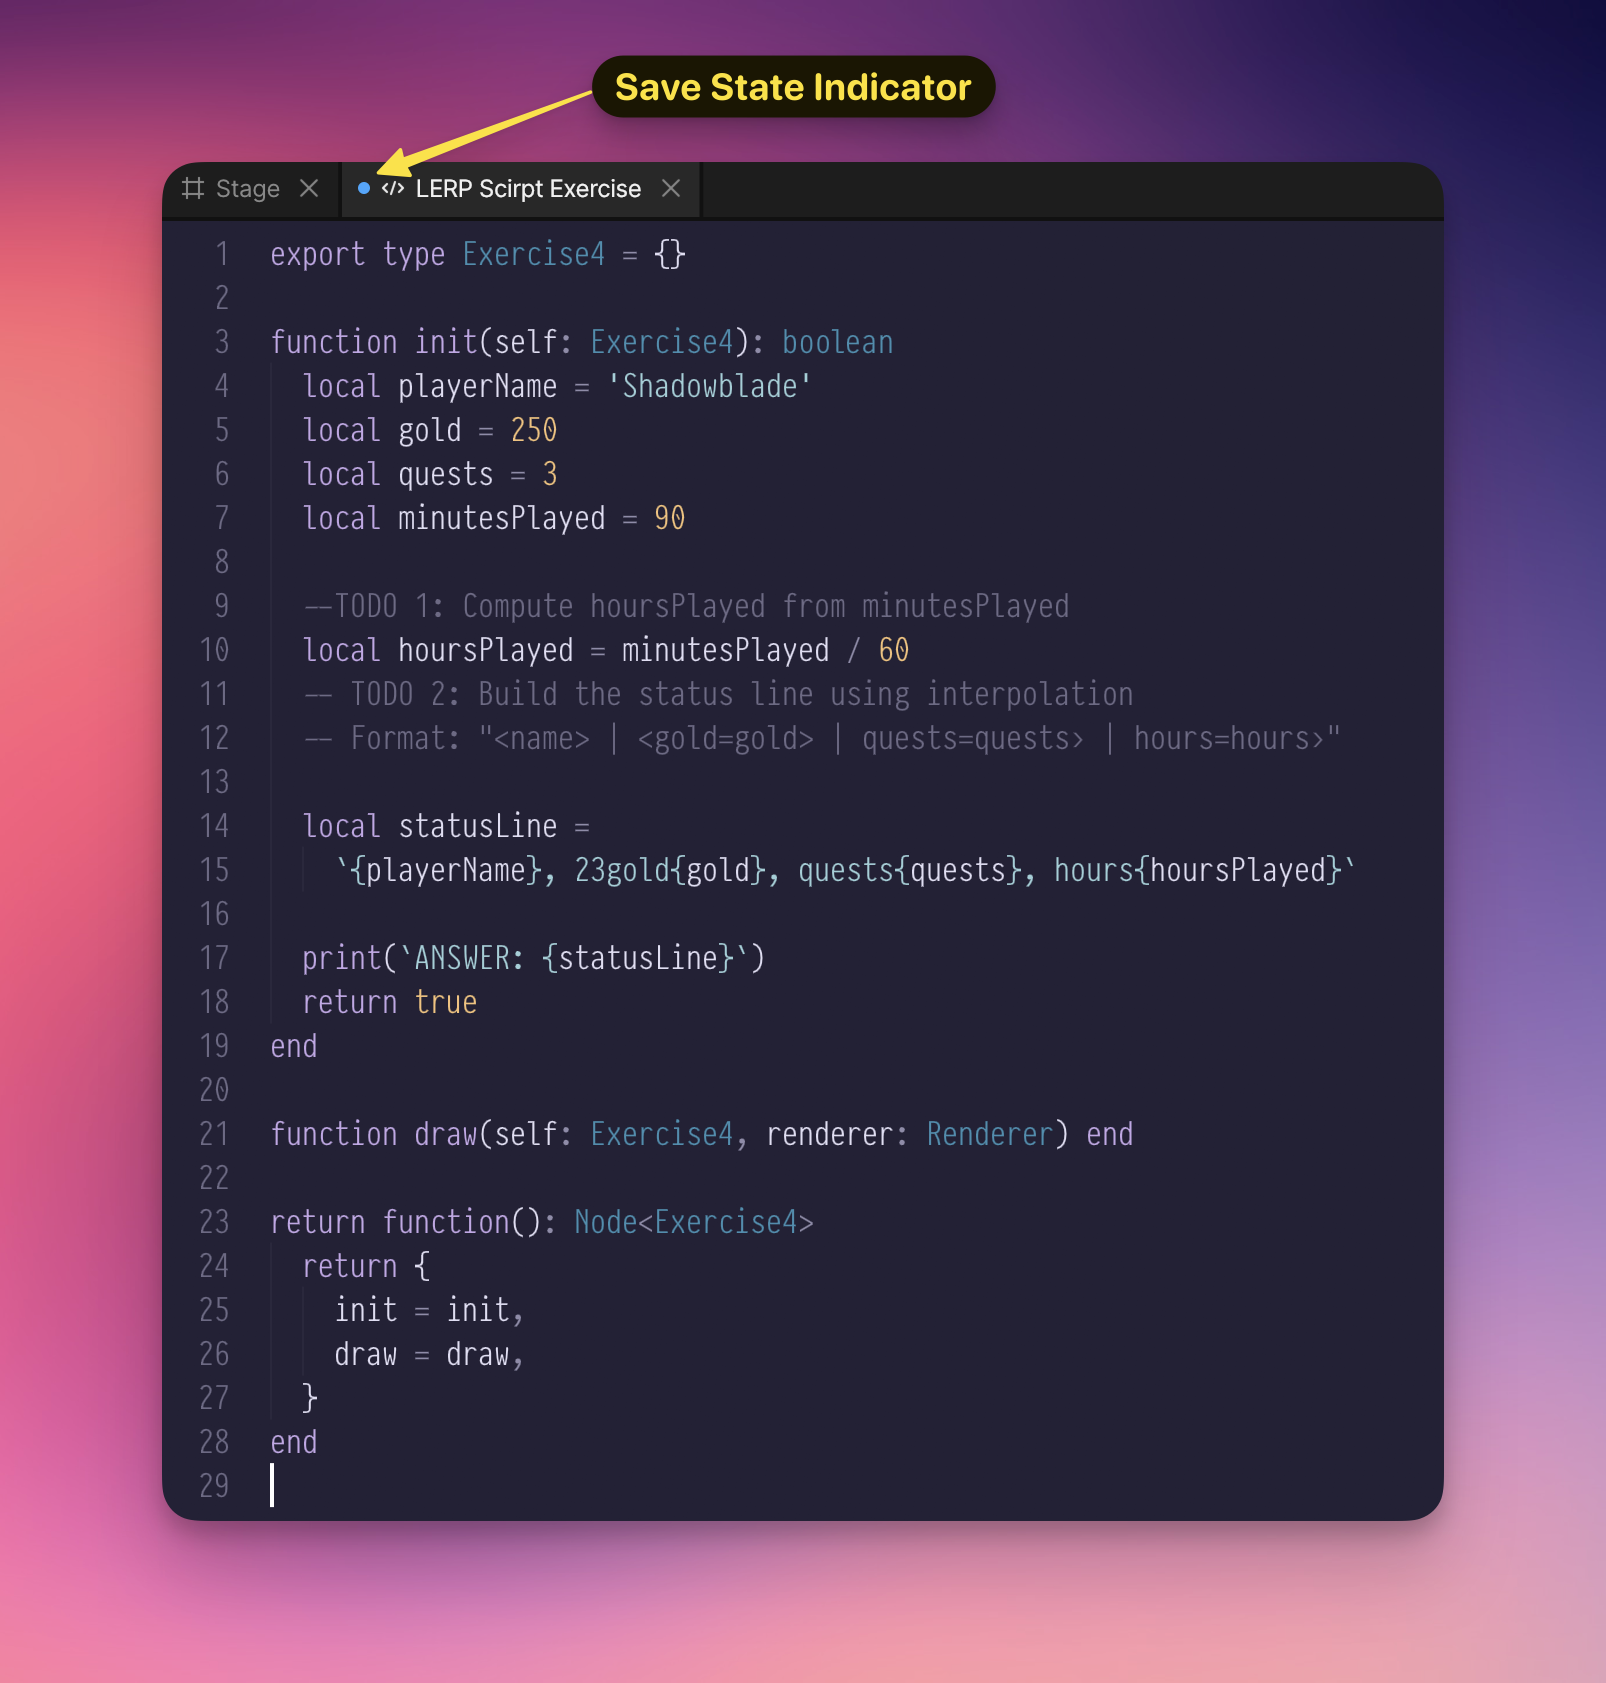
After you paste or edit code, look at the script tab. A blue dot next to the script name means the script has unsaved changes. Save with Cmd+S on macOS or Ctrl+S on Windows/Linux, or rename the script from the Assets panel to trigger a save. Saving recompiles the script and applies your changes. Until the blue dot disappears, the running scene may still use the previous compiled version.
Assignment
Complete these steps:
- Paste the code into your Node Script
- Save the script so the blue dot disappears and Rive recompiles it
- Add the script to the artboard:
- Right-click the artboard and choose
MyFirstScriptfrom the script menu - Position the script node anywhere visible on the artboard
- You may leave it at the artboard root or nest it under your shape; nesting affects hierarchy behavior, but it does not pass the parent shape's
NodeDataorPathDatainto this Node script
- Right-click the artboard and choose
- Press Play (the ▶ button or spacebar)
- Check the Console - you should see the messages from
print() - Find the
ANSWER:line and copy it into the validator
Expected Output
Your Console should show something like:
=== MY FIRST SCRIPT ===
init() is running!
Message: Hello from Rive!
Setup complete!
ANSWER: success
advance() frame #1
advance() frame #2
advance() frame #3
Copy the ANSWER: line from your Console into the validator below.
Verify Your Answer
What If Something Goes Wrong?
Let's intentionally break the script to see what errors look like!
Try This: Remove return true
- In your
initfunction, delete the linereturn true - Check the Problems panel
You'll see an error like:
Type 'nil' could not be converted into 'boolean'
This is the type checker telling you: "You said init returns a boolean, but you're not returning anything!"
Fix it: Add return true back.
Try This: Misspell a Variable
- Change
self.countertoself.countr(typo!) - Check the Problems panel
You'll see:
Key 'countr' not found in type 'MyFirstScript'
The type checker caught your typo before you even ran the script!
Fix it: Correct the spelling back to self.counter.
Checklist
- Script created and named
- Script saved/recompiled after pasting
- Script node added to the artboard
- Pressed Play and script ran
- Console shows the expected messages
-
ANSWER:line appears in Console and validated successfully - (Bonus) Tried breaking the script and saw errors in Problems panel
Key Points
- print() sends messages to the Console - essential for debugging
- init() runs once at startup - you'll see its messages first
- advance() runs every frame - limit your prints to avoid spam!
- Problems panel shows errors before you run - the type checker is your friend
- return true in init means "everything worked, keep running"
New thing: advance - This function runs repeatedly (every animation frame) for updating values over time. We'll cover this more in future lessons.
Knowledge Check
Summary: The Script Pattern
Every Rive script follows this pattern:
export type- Declare what data your script storesfunction init- Set up initial values (runs once)function draw- Render graphics (runs on repaint)return function()- Factory that creates instances
Once this pattern clicks, you'll recognize it in every Rive script!
What's Next?
You've completed the beginner introduction! You now understand the core concepts: variables, types, functions, and the structure of Rive scripts.
Continue to: Variables, Types & Operators
This takes you into Part 2: Luau Fundamentals, where you'll deepen your understanding of the language and write more sophisticated scripts.
The How Rive Scripts Work page covers the same script structure concepts but with JavaScript and After Effects comparisons. You can reference it later if you want to see how Rive concepts map to other languages — but it's not required for your learning path.